Fellowship Hall
- Here are a series of videos you can watch for quick reference:
- Below are a series of step by step instructions:
- Audio
- Video
- Lighting
- AB & CD
- How to Use the Belt Pack and Headset Microphone
- Steps to Attach the Headset
- How to Properly Store the Belt Pack and Headset After Use
- How to Record Room Audio Using the Denon System
- Stage Connect
- Steps for Setup
- Steps for Activation
- Fellowship Hall ABCD Lighting and Audio
- Overview
- Steps for Setup
- Additional Information
- Steps for Setup
- Steps for Setup
- Steps for Operation
- Battery Installation
- Turning On and Off
- Battery Removal and Storage
- Steps for Lighting Control
It may seem a little intimidating getting set up for an event in a venue, but it's not that difficult.
There are three main parts of getting a venue setup:
- Audio
- Video
- Lighting
We will walk you through each one of these so that you can know how to get set up for a basic event.
Here are a series of videos you can watch for quick reference:
- Turn on the Crestron System as your 1st step, if you're using the entire fellowship hall, or any portion of it that connects you to the Main Sounboard. NOTE **If you're JUST using E-H, you'll use the small system on the stage. If you're only using ABCD, you'll use the Crestron screen on the wall under the TV.
- Turn on the Projectors
- Soundboard Operation
- Handheld Mic Operation
- Beltpack Operation
- Beltpack Put Away
- Audio Record your event on the Denon
Below are a series of step by step instructions:
Audio
The first thing that we need to do is to make sure Look at the LCD screen on the top right of the sound board and look in the bottom right of that screen. You want that to say Basic.
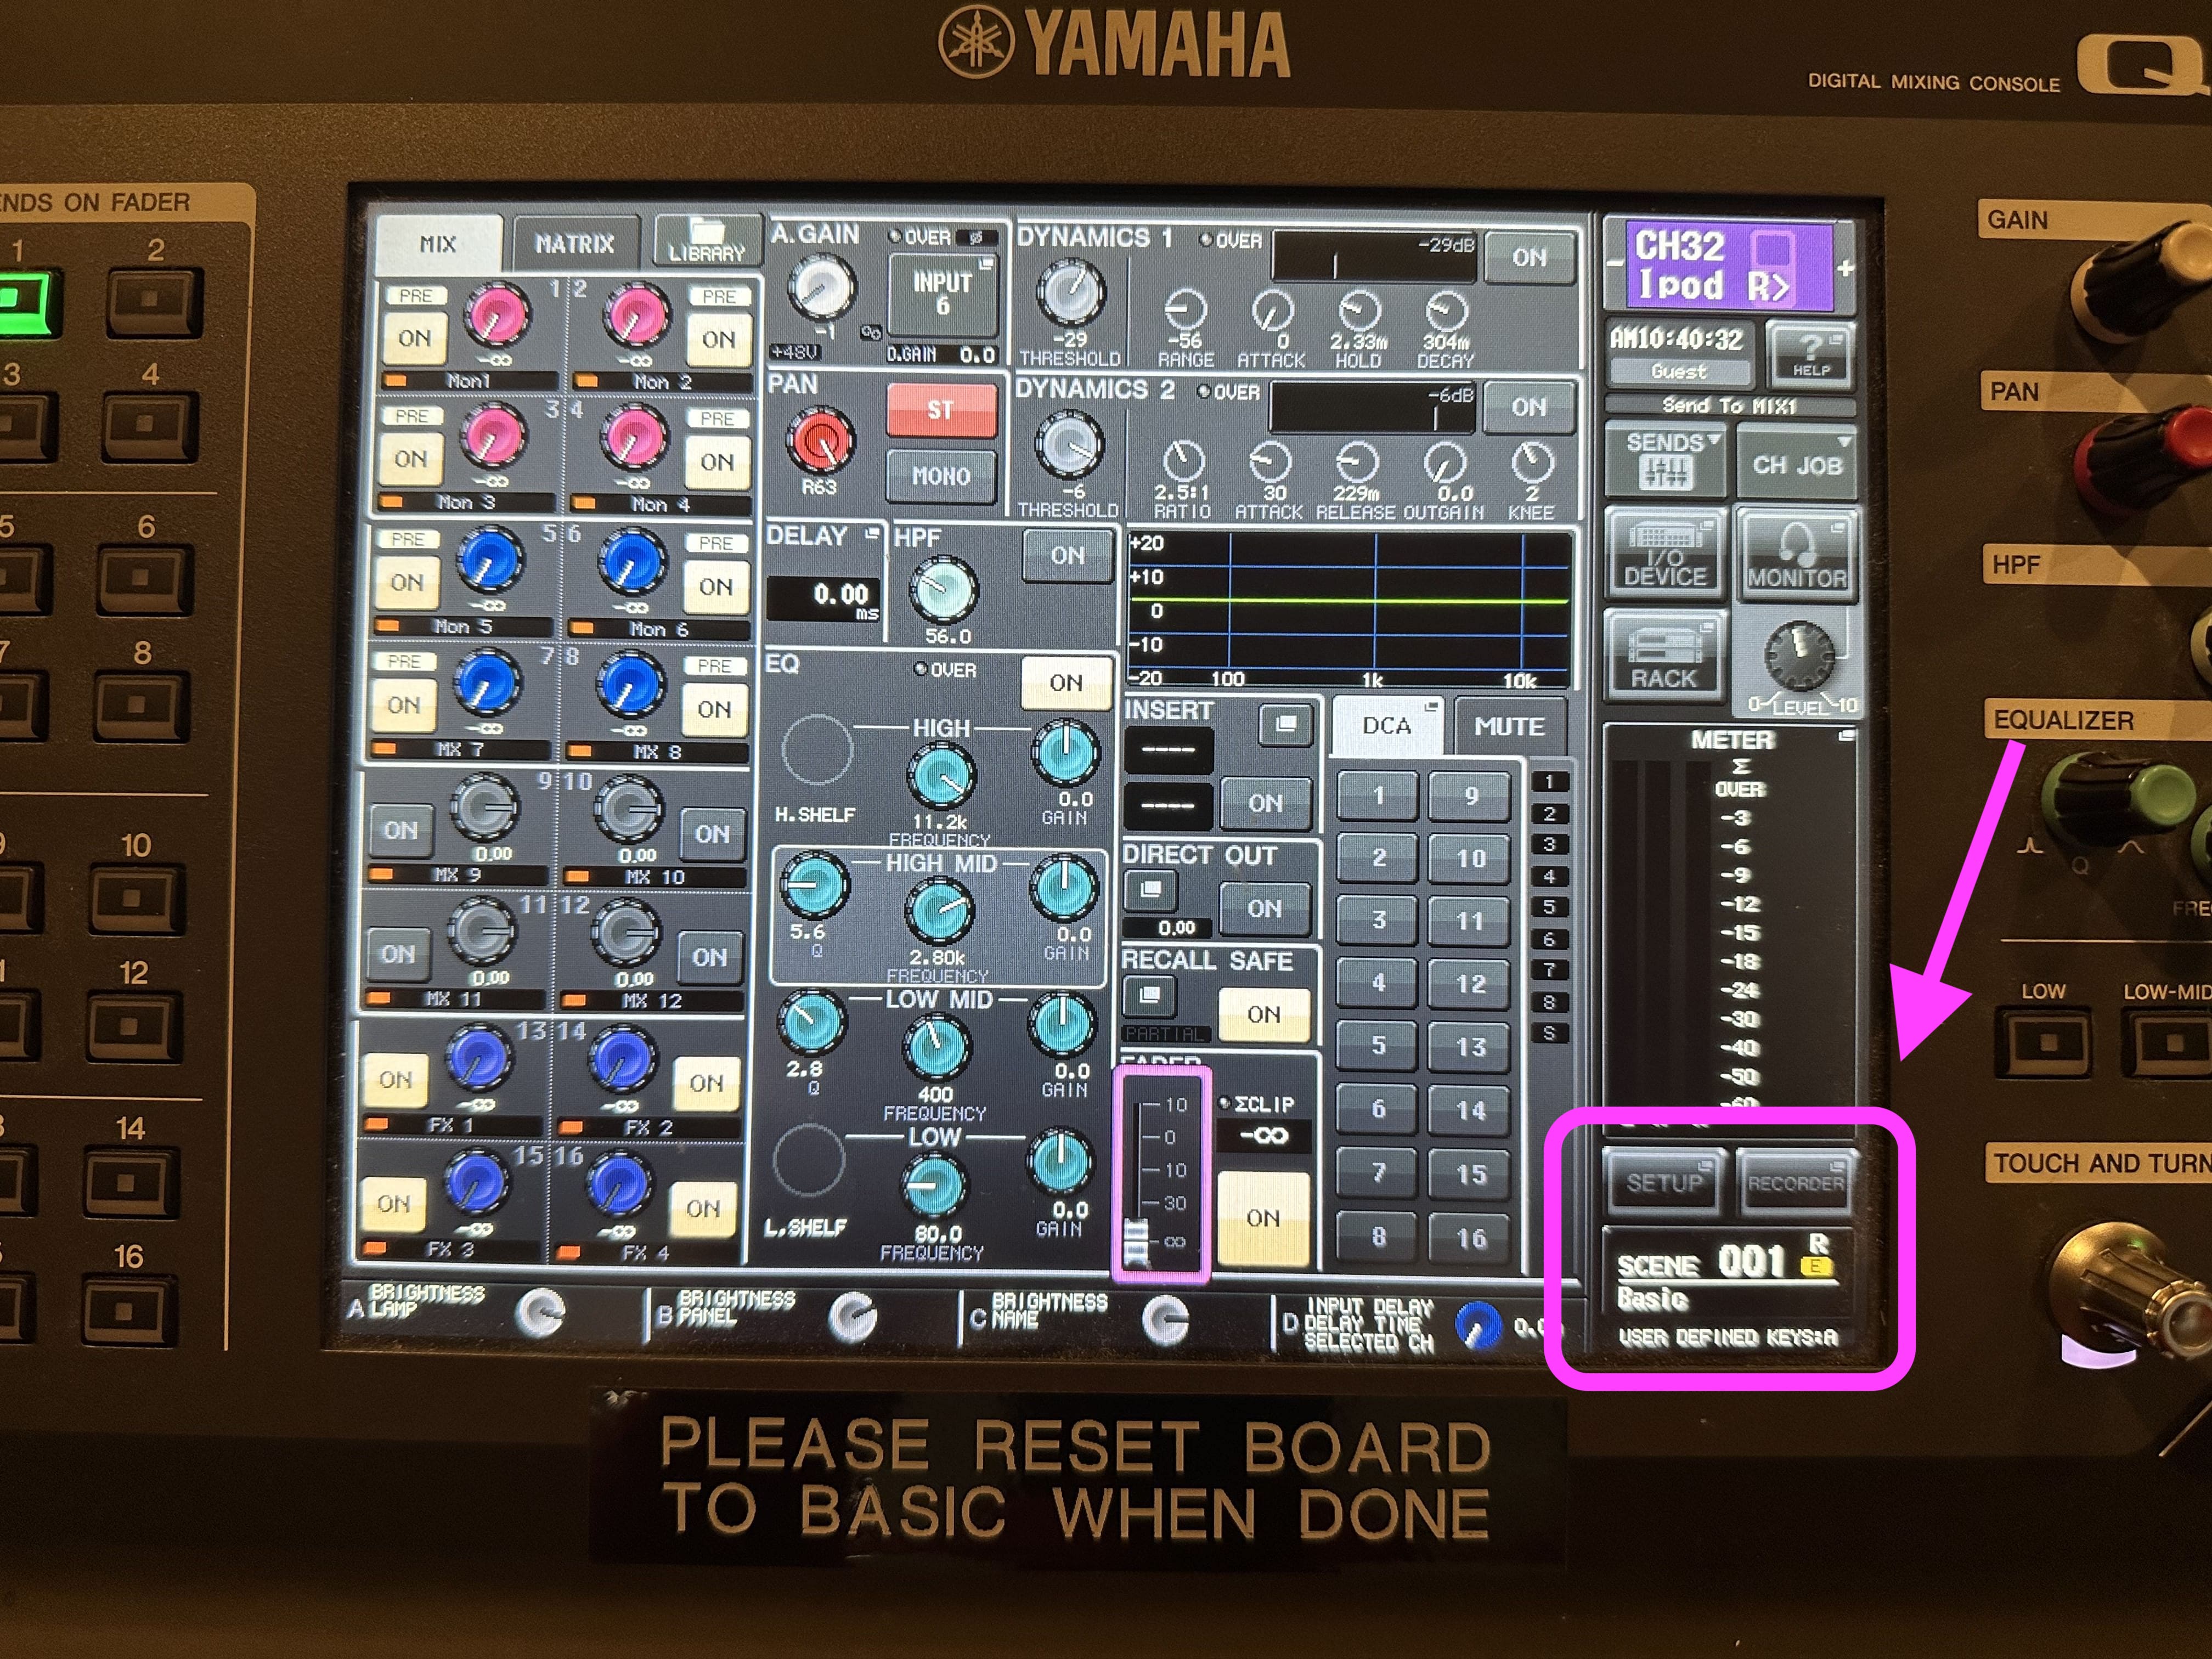
If it is not on Basic then you can tap that button and then look on the left side of the screen. These are the “scenes" that have preset audio levels. Look for Basic and then tap on it and then tap on Recall. You now have the proper presets set up on the sound board.
Microphones
Next step is to get the microphones that you need set up.
Open the drawer that has the microphones.
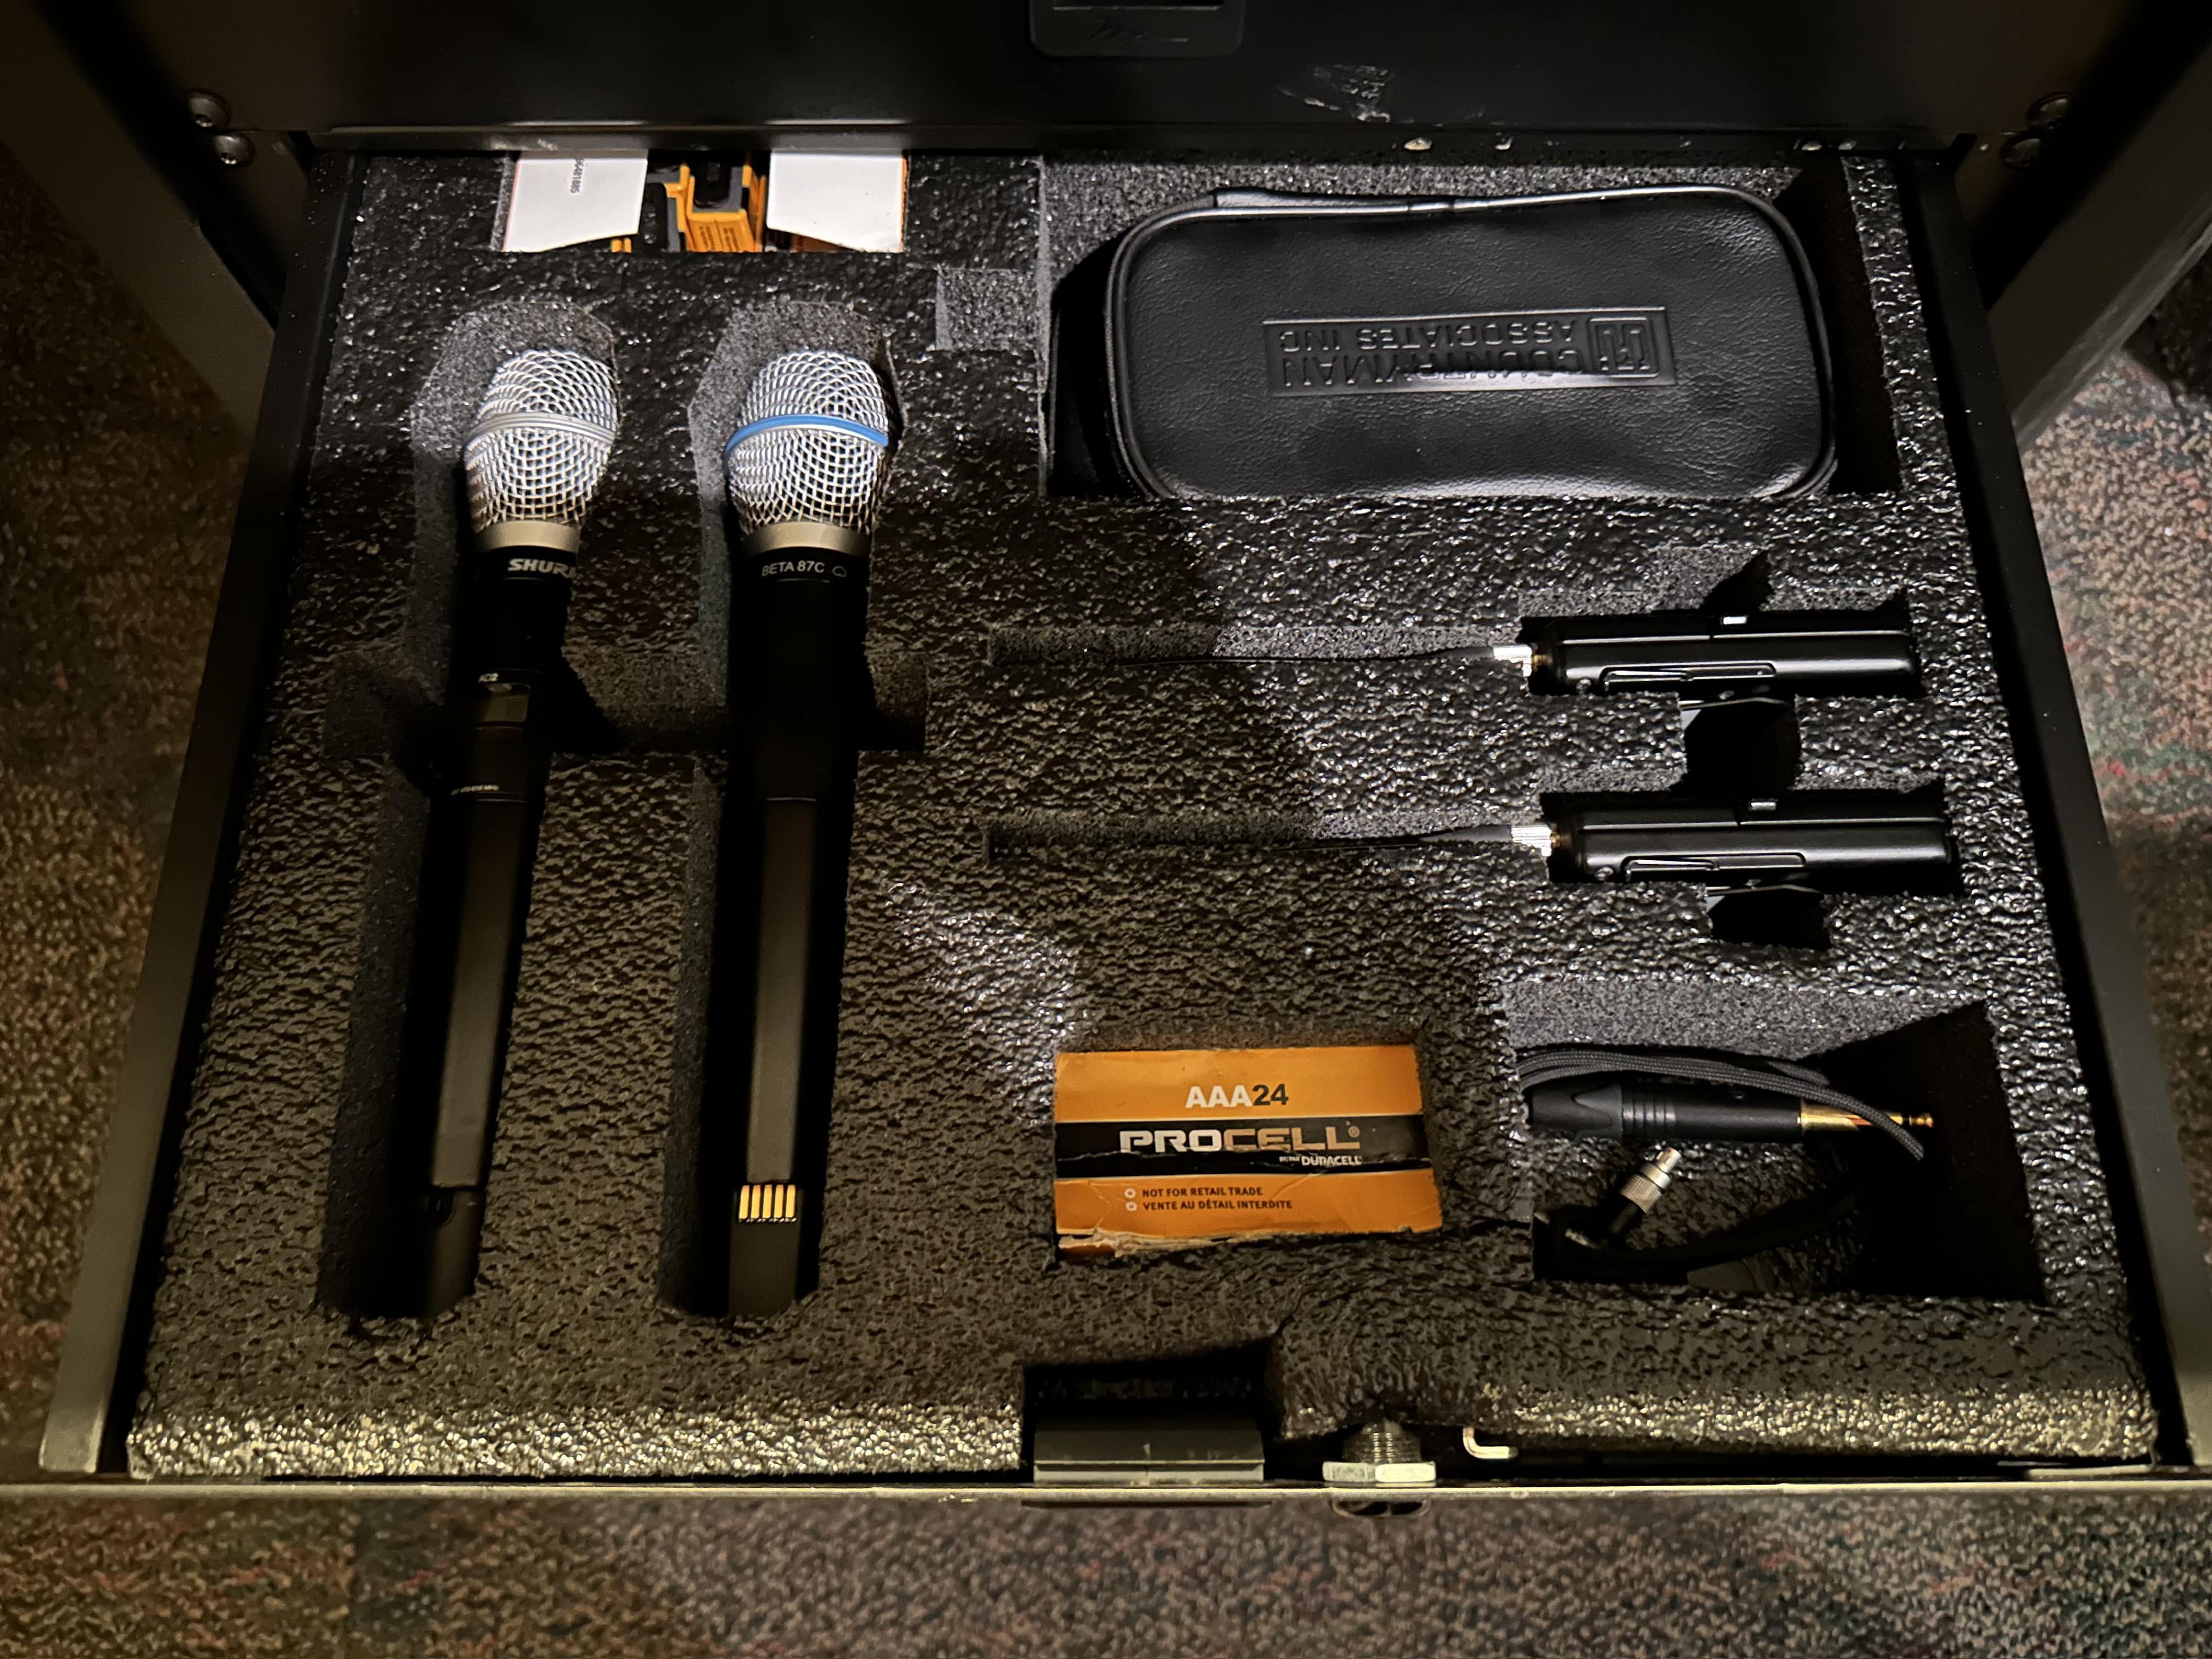
Take out a mic and a battery. Put the battery into the microphone. Keep in mind that the battery will fit in two different ways, but will only work one way. So if you put the battery in and it isn’t working, take the battery out and turn it around.
Once you have it on with the battery start tapping the top of the microphone and look at the sound board. You will see some of the levels moving as you tap the top. This is the sound level that controls the audio of the microphone.
The light that says ON needs to stay on. Also, ignore the Select button. It can be tempting to press that button to “select" the microphone, but that's not what it does. Ignore it.
If you see the levels when you tap the top of the microphone, you are good.
If you need a lapel mic, get one from the drawer and remember to twist the battery in. Getting the audio set up for a lapel mic works the same as a standard handheld mic. Just tap the mic to see which levels start moving. When you see the levels start to move as you tap the mic you will see which fader controls that audio.
Background Audio
One of the easiest way to get background audio is to use the iPad Line. This will plug a cord directly into your phone and you can play music from your phone. If you need an adaptor to plug it in, look in the drawer and you will find a case with the proper adapter depending on the phone you are using.
Make sure the volume on your phone is turned all the way up and then you can use the fader on the board to control the audio.
Video
When it comes to using video, just remember that audio follows video. If you have a video playing it will take precedence over anything else.
To play a video you will use the Crestron to choose when to send it to the screens. The screens will automatically come down once you press the On button.
Both video and audio will come through the HDMI cord that goes straight to your computer.
Keep in mind that if you want to use the computer that is there then you need to be comfortable using the apps that are on there like ProPresenter, Powerpoint and Keynote.
To send the video to the projector press the Send to Projector button. If the light is solid green then the video should be live. If the light is blinking red then it should be in preview mode which means that you can see it, but it shouldn't be shown on the screen.
If you want to record the audio for the event, look down at the console below the desk. There will be a record button. Press it once to get it ready to record and then press it a second time to start recording.
If you want the event to auto-record, reach out to the Tech team and they can get that set up for you.
Lighting
To control the lighting use the left side of the board. The first 9 faders are for the lights.
The top line of faders is for the left side of the Fellowship Hall and the bottom row of faders is for the right side of the Fellowship Hall.
X is up and Y is down.
Turn the lights that you want all the way up and then just use the Master fader to control the levels. 60% power is a good level to keep it at.
AB & CD
How to Use the Belt Pack and Headset Microphone
The belt pack is a versatile piece of equipment that allows you to use a headset microphone for enhanced audio quality. This guide will walk you through the steps to properly set up and use the belt pack and headset microphone.
Accessing the Belt Pack
- Locate the designated drawer where the belt pack is stored and open it.
Battery Installation
- Take out the rechargeable batteries stored in the same drawer.
- Insert the battery into the belt pack, ensuring that the text on the battery is readable. This confirms that the battery is placed correctly.
- Close the battery compartment.
Powering On
- Turn on the belt pack using the switch located at the top.
- For the next steps, make sure to turn off the belt pack.
Steps to Attach the Headset
Locating the Headset
- The headset is stored in a small case near the belt pack drawer.
- Open the case and take out the headset.
Connecting the Headset
- Locate the end of the headset that screws into the belt pack.
- Align the two small knobs on the back of the headset connector with the corresponding slots on the belt pack.
- Once aligned, the connector will click into place, allowing you to screw it in securely.
Final Steps
- Turn the belt pack back on.
- Place the headset over your ear to complete the setup.
How to Properly Store the Belt Pack and Headset After Use
Steps for Storing the Headset
Disconnecting the Headset
- Unscrew the headset from the belt pack and remove it.
Wrapping Up the Headset
- If there are any knots, untangle them first.
- Neatly wrap the headset cable.
Storing the Headset
- Place the wrapped headset back into its designated case.
- Thread the small loop on the case through the headset cable for added security.
- Zip up the case.
Steps for Storing the Belt Pack
Powering Off
- Make sure the belt pack is turned off.
Removing the Battery
- Open the battery compartment and remove the battery.
Charging the Battery
- Place the battery back in its charger, ensuring that the circle and tab on the battery are facing outward.
- Press down on the battery to secure it in the charger.
Storing the Belt Pack
- Place the belt pack back in its designated spot in the drawer.
How to Record Room Audio Using the Denon System
Initiating the Recording
- Locate the Denon system and identify the "Record" button.
- Press the "Record" button once; it will start blinking to indicate it's ready.
- Press the "Record" button again to start the recording. The light will turn solid red, confirming that the recording has begun.
Monitoring the Recording
- Keep an eye on the Denon system's display. It will show a timer, indicating the duration of the recording.
Stopping the Recording
- To stop the recording, simply press the "Stop" button on the Denon system.
Saving and Scheduling
- The recording will automatically be saved on the server.
- For recurring meetings, they are usually pre-scheduled to be recorded. However, it's always good practice to double-check if you want your specific meeting to be recorded.
Stage Connect
Steps for Setup
Preparing the Laptop
- Retrieve Dongle and HDMI Cord: Go to the rack and find the bag containing various dongles. Also, grab an HDMI cord.
- Connect to Stage Box: Head to the front of the stage and locate the box on the left. Connect the HDMI cord and dongle to your laptop.
Projector Setup
- Switch Source: On the soundboard, switch the source from "Booth's PC" to "Stage Floor Box."
- Send to Projectors: Click on "Send to Projectors." You should see your presentation on the confidence monitor.
- Activate: Press "Send" to project your presentation onto the main screen.
Sound Setup
- Locate Video Sliders: On the soundboard, find the sliders under "Video."
- Adjust Volume: Slide up the video sliders to adjust the volume.
- Master Volume: Ensure the master volume is also turned up.
Fellowship Hall Projector Activation Guide
Steps for Activation
Engaging the Projectors
- Locate the Buttons: In the big sound booth, find the buttons labeled "Turn On Projector."
- Press the Buttons: Press both buttons to initiate the projector system.
Additional Considerations
- Obstructions: Check for any objects, like the "Perimeter Church" stanchion, that might obstruct the descending screen. Move them if necessary.
Fellowship Hall ABCD Lighting and Audio
Overview
This guide provides step-by-step instructions for managing the lighting and audio controls in various rooms of the church. It's designed to help volunteers and staff operate the equipment efficiently and effectively.
Section 1: Lighting Control Basics
- Identifying Control Panels: The lighting control panels are labeled A through D. Familiarize yourself with their locations in each room.
- Master Control: The overall master control adjusts the general lighting level. Start by setting all individual light faders to high and then adjust the master control to the desired level.
- Using the Blackout Function: To turn off lights before a service without adjusting individual faders, use the blackout function. This turns off all lights until reactivated.
Section 2: Projector and Room Combination Controls
- Turning On the System: Activate the system by touching the screen on the console. This action powers up the desk, PA system, and allows access to the control screen.
- Projector Operation: To turn on the projector in a single room, use the designated switch. If rooms are combined, the switch will activate projectors in both rooms.
- Combining Rooms: When combining rooms, use the control panel to select this option. A separate panel is available in each room for this function.
Section 3: Audio and Microphone Setup
- Belt Packs and Microphones: Prepare belt packs and microphones as needed. Each room should have a designated number of belt packs.
- Microphone Care: Check microphones for any damages or issues, such as kinks in the wires. Ensure they are set up correctly for optimal audio quality.
- Adjusting Microphones: Make necessary adjustments to the microphones, keeping them close enough to capture clear audio without causing pops or distortions.
Section 4: Audiovisual Inputs and Prompter Control
- Connecting Laptops: To connect a laptop, use an HDMI cable from the back panel and connect it to the designated HDMI input.
- Prompter Operation: The prompter, located in the corner, can display different sources. Adjust the source as needed for the presenter's convenience.
- Switching Sources: Remember to switch sources both for the projectors and the prompter separately to ensure correct display.
Section 5: Scene and Layer Adjustments
- Setting Scenes: For basic operation, select the 'basic' scene and recall it.
- Layer Adjustments: Check if the correct layer (A or B) is selected. Adjust to the default layer (A) if necessary for standard operation.
Section 6: Screen and Projector Shutdown
- Lowering the Screen: The screen automatically lowers when the projector is turned on.
- Turning Off Projectors: Use the same switch to turn off the projector. This also raises the screen back up.
Additional Tips:
- Always ensure batteries are available and fully charged.
- Record functions need to be activated twice for it to start recording.
- Regularly check the condition of headsets and microphones.
- Provide assistance to volunteers or staff unfamiliar with the equipment.
- Avoid unnecessary button presses to prevent configuration errors.
Booth External Laptop Connection Guide for Fellowship Hall
Steps for Setup
Preparing the Crestron Panel
- Press the Crestron Panel: This will turn on the sound system and prepare the projectors.
- Select Source: Choose "Link Panel" as the source since the laptop will be connected there.
Connecting the Laptop
- Locate HDMI Port: Find the HDMI port on the wall near the booth.
- Plug in HDMI Cable: Connect an HDMI cable from the port to your laptop.
- If your laptop lacks an HDMI port, use a dongle from the drawer.
Projector and Sound
- Activate Projector: Go back to the Crestron panel and press "Turn On Projector."
- Sound Channels: If you need sound from the laptop, adjust the video channel volume knobs.
- Master Volume: Ensure the master volume is also up.
Final Steps
- Send to Projector: On the Crestron panel, press "Send to Projector" to display your laptop screen on the projector.
- Sound Test: Open a video or audio file to test the sound. Control the volume using the sound knobs and the master volume.
Additional Information
- If you're using the entire Fellowship Hall, you'll need to press "Combine" on the Crestron panel.
- The same setup process applies if you're on the other side of the room; the panel and connections are identical.
- You can also connect from the stage using the floor boxes; just inform the Crestron panel to take information from the "Stage Box."
This part is for The EFGH side of the Fellowship Hall Only
Fellowship Hall E-H Bluetooth and Mic Operation Guide
Steps for Setup
Bluetooth Setup
- Locate Bluetooth Panel: Find the Bluetooth control panel on the stage.
- Pairing Mode: Press the button to activate pairing mode; a blue light will blink.
- Phone Settings:
- Make your phone discoverable in Bluetooth settings.
- Select "Fellowship E through H" to connect.
- Volume Control: Use the Bluetooth knob to adjust the volume.
- Disconnect: When done, disconnect from your phone and reset the volume knob to zero.
Handheld Mic Setup
- Locate Mic: Find the microphone in the drawer.
- Battery Installation:
- Use AA batteries as this stack doesn't support rechargeables.
- Positive end goes up, negative end down.
- Turn On Mic: The switch is at the bottom of the mic; turn it to the minus sign.
- Volume Control: Use the "Wireless Handheld" knob to adjust the mic volume.
Cleanup
- Reset Knobs: Turn all volume knobs back to zero.
- Battery Removal:
- Remove batteries from the mic.
- If lightly used, place them aside; otherwise, put them in the recycle bin.
Fellowship Hall EFGH Presentation Setup Guide
Steps for Setup
Projector Setup
- Locate the Crestron Panel: On the rack, find the Crestron control panel.
- Activate the Panel: Touch the panel to activate it.
- Turn On Projector: Click the option to turn on the projector.
- Descend the Projector: Ensure the stage is clear as the projector descends.
HDMI Connection
- Locate HDMI Cable: Find the HDMI cable and a converter if needed.
- Choose Connection Point:
- Link Panel: For offstage control, use the link panel.
- Stage Box: For onstage control, use the stage box.
- Plug In: Connect the HDMI cable to the chosen point and to your computer.
Sound and Video Control
- Select Source on Crestron:
- Green Indicator: Make sure the source you're using (Link Panel or Stage Box) is highlighted in green on the Crestron panel.
- Send to Projectors: Click this option to send your computer's display to the projector.
Troubleshooting
- If the display isn't showing up, double-check all cable connections.
- Toggle between the Link Panel and Stage Box options on the Crestron panel to refresh the connection.
Fellowship Hall Projector Operation Guide
Steps for Operation
-
Locate Remote: The remote control for the projector is stored in a drawer.
-
Unlock Remote: Make sure the lock on the remote is set to 'Off'.
-
Power On:
- Press the 'Power' button on the remote.
- Point the remote at the projector.
-
Confirmation:
- A green light should appear on the projector, indicating it's powered on.
Handheld Microphone Operation Guide
Battery Installation
-
Locate the Microphone: Find the handheld microphone stored in the designated area.
-
Open the Battery Compartment: Unscrew the bottom part of the microphone to access the battery compartment.
-
Remove Old Battery: If there's an old battery, remove it. The batteries are rechargeable and stored in a specific area.
-
Insert New Battery:
- Positive end should be on top.
- Negative end should be on the bottom.
-
Close the Compartment: Screw the bottom part back on.
Turning On and Off
- To Turn On: Slide the switch to the right.
- To Turn Off: Slide the switch back to its original position.
Battery Removal and Storage
-
Open the Compartment: Unscrew and open the battery compartment.
-
Remove the Battery: Take out the battery.
-
Proper Orientation: When placing the microphone back, ensure the side with the circle and tab is facing the correct way.
-
Close and Store: Close the compartment and store the microphone in its designated area.
Lighting Control Guide
Steps for Lighting Control
Master Control
- Ensure the master fader is turned all the way up.
- If the master is down, no other controls will work.
Mode Selection
- Make sure the mode is set to "channels 1 through 8."
- The indicator should be green when this mode is active.
Area Control
- Use the faders to control specific areas of the stage.
- You can control these both from the upper and lower sections of the panel.
Brightness Control
- If you want all areas to be dimmer, you can turn down the master fader.
- For individual area dimming, use the specific fader for that area.
Crossfade Settings
- Ensure the "X" fader is up and the "Y" fader is down on the crossfade control.